Flowers Timelapse - how I did it...
January 2013
I've been recieving many questions about how I did my timelapse video that I posted on Vimeo and YouTube at the beginning of this year (2013), so I made this page with more information and photos from "behind the scenes" :)
The whole setup was very simple, I didn't have much time and resources to build anything special. I just wanted to try it,
so all I used were just things I had at home, some photography knowledge and equipment and a common sense :)
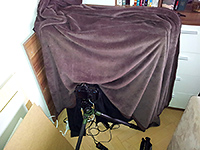
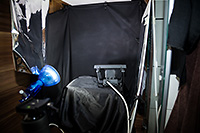
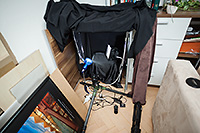

The most important thing you need is a place that you can insulate from a daylight (in particular from the change of light, you need to keep the light constant all the time). So I found a corner with a cabinet in my living room. I emptied that cabinet, attached a black cloth to the back of it, white boards to the top and one side and shiny silver foil to the other side (boths for light reflection). The flower was in the middle, tripod was in front of it and then the whole setup was covered with another black or dark cloth to (almost ;) completely insulate it from any light in the room.
As the light source I used two LED lamps. There was no special reason for using those, just two lamps I had at home, they have low power consumption and don't heat too much. No need to care about the color, always shoot in RAW and fix your white balance in postprocess. I tried not to point the lamps directly at the flower, to make the light more diffused I used reflection (any diffuser would work probably even better)
I was shooting the flowers that I had at home or from my mother's garden. Visit your local flower shop and ask for a flower that bloom fast.
What I used:
Camera: Canon 5D Mark II with 24-105L
(and several times 17-40L when my 24-105L was broken)
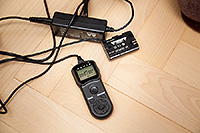
Remote Control (Intervalometer): JJC TM Series (TM-A for my camera)
AC Adapter kit (External power): The camera should be on external power, it is not comfortable to do it on battery (as I found out after getting up at night checking if the battery is still ok :) And changing it on the tripod while trying not to move with the camera wasn't easy as well). I used an unoriginal adapter kit that I bought from a local store for about $65 (the original one for 5D MkII ACK-E6) (cheap one on Amazon)
2 LED Lamps: just two lamps that I found at home.
White board and silver foil for reflecting and difffusing the light, black cloth, some clips and of course a tripod (the black Vanguard tripod that you see on the pictures
lying on the floor)
My camera setting
Camera on manual mode,
f14-f16, time about 1/6s, ISO 640, WB manual (corrected later in CameraRaw) - lower ISO and shorter time would be definitely better, those LED lamps just weren't strong enough
Focus usually about 50mm (do not zoom in too much to have large depth of field, also the flowers can move and get out of focus if the depth of field is small)
Timing
First you need to know how long it takes the flower to bloom, it can be few hours or few days and the time between photos can be from about 40sec to 10 or more minutes.
Then think about how long the footage should be (I was trying to make each footage about 7-12 seconds), and then just take a calculator and do the math :)
For example - 10 seconds video at 30 frames per second, that means you need 300 frames (photos),
if it takes 20 hours for the flower to bloom, your interval is about 4 minutes
flowers from the movie:
Lily - I started to take pictures of this lily at 0:36 on 6 July and the last photo was taken on the same day at 21:18 (9:18 PM)
interval between photos was 6 minutes and I took 208 pictures.

Zygocactus - shooting whole day, started at 8:20, ended 0:50 - 661 photos, interval 90 seconds

Gardenia - started March 17 at 4:41, ended March 18 at 14:48 - 217 photos, interval 9 minutes

Amaryllis - started July 18 at 16:20, ended July 19 at 15:12 - 163 photos, interval 6 minutes, later adjusted to 10 minutes

Gladiola - shooting for 2 days and 2 hours - started August 11 at 21:57, ended August 14 at 00:17
interval 10 minutes, 303 photos

Another lily - shooting started July 9 at 21:34, ended July 11 at 16:00 - however it took it two days to open, so I started with
the 8 min interval and then slowed down to 20 min, 179 photos
